
As it seems with every other generation of Canon dSLRs, the EOS 50D was a solid, if somewhat uninspired follow-up
to the extremely well-received 40D. Now it's the 60D's turn to be the interesting model. It combines some of the
best elements of the T2i and 7D in an updated--and occasionally frustrating--redesigned body. Canon 60D is an HD
camcorder that record videos of 720/60p and 1080/30p s SD in MOV format. How good they play on your PC depends on
how powerful your PC is. Basic editing software may have a hard time with the 60D footage, as it is H.264 encoded
high-def streams. If you have a powerful PC with powerful editing software like Adobe Premiere Pro CS 5 (or Sony
Vegas Movie Studio HD, Pinnacle Studio) installed, it won’t be a problem for playing and editing the 60D footage,
otherwise you may get involved in playing back and editing issues. In that case, many people convert the H.264
codec into something more common, e.g. AVI and WMV. The following guide tells you how to convert Canon 60D MOV to
1080p AVI/WMV for editing and playing back.
Required software: Pavtube HD Video Converter
The software does a good job in converting H.264 .mov files to AVI, WMV formats for editing in sync and not loose
much quality. And it allows you to join the Canon 60D clips together, and add audio track to the video as
background music.
Step 1. Load H.264 .mov footage to Canon 60D MOV Converter.
Transfer h.264 encoded .mov files from Canon 60D camcorder to computer via USB cable. Download a
trial of Pavtube HD Video Converter and run the
software as the best Canon 60D MOV converter. Click the "Add" button to load .mov videos from 60D camcorder.
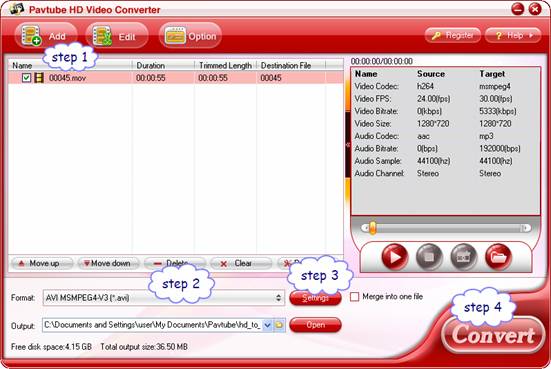
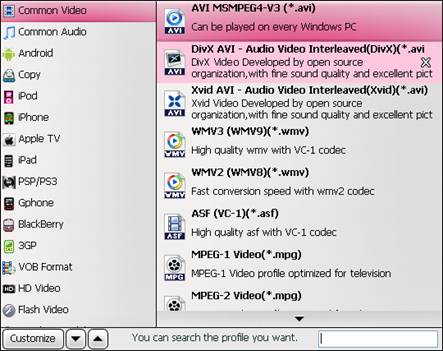
Step 2. Set AVI or WMV format as output format for editing.
Click “Format” bar to determine output format. Follow “Common Video” and select any format from “AVI MSMPEG4
-V3 (*.avi)”, “WMV3 (WMV9)(*.wmv)” and “WMV2 (WMV8)(*.wmv)”.
Step 3. Adjust video and audio settings to keep 1080p HD quality
Click "Settings" button, then you will be able to adjust audio and video parameters on the popup window to
customize the output file quality, these adjustable parameters include codec name, aspect ratio, bit rate, frame
rate, sample rate, and audio channel. To maintain original HD quality, you may set “original” in the fields of
“Size”, “Bitrate” and “Frame rate”. To downsize the Canon 60D .mov files, just set a smaller bitrate.

Step 4. Click "Convert" button to [url=http://www.pavtube.com/guide/convert-ni ... vi-wmv-hd-
video.html]convert Canon 60D MOV files to HD AVI/WMV[/url].
Once the conversion is finished by Canon 60D MOV to AVI Converter, you can click "Open" button to get the output
files effortlessly. Now you have got it right, just import and editCanon 60D MOV files with common editing
software like Magix Movie Edit Pro or load the EOS 60D clips to Windows Media Player for playback.
Additional editing features of the Pavtube HD Video Converter
Trim a section of the 60D clip- click ‘Editor’, switch to ‘Trim’ tab, and input time point in start and end
box.
Combine Canon 60D MOV footgae together- check the files to be merged in file list and check ‘Merge into one’ box
beside ‘Settings’ button.
Deinterlace- click ‘Editor’, switch to ‘Effect’ tab, find ‘Deinterlacing’ box, and check it to eliminate
interlacing lines.
If you want to update EOS 60D cilps to Myspace, Flikr, YouTube, etc, just choose “Flash Video>>FLV” instead.
For Mac users, there is HD Video Converter for Mac software that converts 60D video to QuickTime MOV and DV AVI
formats that are editable for FCP, FCE, iMovie, etc.


